Monday, December 23, 2013

Design Wall ~ The Final Stretch

Finally, all blocks assembled. Two border units completed. Two more to go.  Then the real fun begins when I attempt to miter the corners with the border print.


Hope to complete the top sometime during the next week or two.  I need to order batting and backing fabric. Then this quilt top will come off the design wall and into a quilt frame for hand quilting.  Several ideas are roaming in my mind for next quilt project to put up on my design wall.

The Design Wall Mondays hosted by Judy at Patchwork Times have kept me motivated. May you all have a blessed Christmas.


Tuesday, December 17, 2013

Why We Need to Prewash Quilt Fabric

In preparation of my quilt borders, I needed to order extra fabric.  It arrived promptly from the Holly and Ivy Etsy shop.

Prior to anxiously cutting into the fabric, I realized that I had to delay one day by prewashing / soaking the rusty burgandy Moda fabric (the good stuff).  Gosh, am I glad I did!

First soak in lukewarm water and dye-free All (small amount)
Second soak in very warm water and Synthrapol SP
(a textile detergent)
Last, but not least, third soak in cold water and white vinegar
Phew! I am now confident to proceed without fabric worries other than attempting to line up fabric for a nice mitered border.  Here's a sneak peak:

Practicing border layouts
Check out other Esther's blog to see her last WOW linky party for 2013.

Wednesday, December 11, 2013

Golf Ornament Reveal

My slow stitching project was completed in time for the annual ornament exchange at my ladies golf league Christmas dinner.  It got down to the wire.  Stitching was completed, inset was pieced with golf-theme fabric and tied with red velvet ribbon with six hours to spare!  Lucky for me the party was in the evening and not a luncheon.


Phew! It was not perfect, but good enough. It was well received. Above it is pictured on a table-top tree. Finished size was about 4 inches.  Thanks to all the encouragement on sticking with it. 


Sunday, December 8, 2013

Slow Stitching Ornament

This is just a quick post to show my SLOW stitching progress on my cross stitch project began last week.  I was hoping to show the completed ornament this week, however, my stitching is a behind schedule due to other holiday preparations and activities. Am I the only one lagging behind?

Center of ornament will be the design within dashed lines.
The golf hole is complete. Today I work on the pretty blue sky and clouds. Tomorrow the design will be set as an insert into golf-theme fabric and then made into an ornament.  Of course, it should have been completed by now, but I still have two more days before the ornament exchange.  Lol!

To see pretty projects, see Kathy's Quilts weekly post entitled Slow Stitching Sunday.

Sunday, December 1, 2013

Slow Stitching Sunday

Today is my first link-up to Kathy's Quilts weekly link party entitled Slow Stitching Sunday.

My current quilt is not ready for hand work. Therefore, I am cross stitching a small item to give as part of an ornament exchange for my golf league. I purchased this colorful pattern online from CrossStitch and it downloaded it to my computer. How simple is that? Gosh, I didn't even have to pay postage.

Original intent is for a bookmark, but I am only stitching the middle section of golf hole, green and sky. I will then use this as an insert to some golf fabric from my stash which will be stuffed. I will then tie a pretty red ribbon for hanging.


Ten days left on the calendar to complete it! It is now time to prioritize my time. Hopefully, next week I can show the completed ornament. May you find time during this busy season to do some stitching even if it is for a few minutes. It all adds up.


Thursday, November 28, 2013

My New Sewing Buddy


My new best friend is a Featherweight 221. A recent estate sale find. Birth year is 1957.

One of my dreams was to find a nice clean FW at a garage and/or estate sale at a frugal price. My wish partially was fulfilled recently after many years of searching. I was at a conducted estate sale (one which is run by a company). Upon walking into the family room another shopper already had the FW (with case) in his possession. Drats! Then to my own astonishment, I heard myself offer him more money then it was priced. He accepted my offer.

I left the well-kept home almost skipping down the street. The cost of my FW was not a wishful price like we all hear about of one paying a few dollars at a garage sale. However, it was still a bargain as I paid a lot less than ebay or antique store prices.

Upon arriving at its new home for the real test drive, the motor seemed to run hard/sluggish. Oh dear. After a few repair quotes were obtained from several professionals ($70-$150), I decided to attempt to fix it myself.

With the combination of the manual and FW online resources, I was able to get the machine running smoothly. Actually, the end result was that it was a simple fix and only required minor surgery:


My "surgery" supplies:
  • Natural daylight
  • Old vinyl tablecloth and bath towel to protect my kitchen table
  • Tweezers
  • Magnifying glass
  • Screwdriver
  • Rubberband (for gripping purposes)
  • Hair dryer with nozzle (to blow out the lint)
  • Cotton swaps (Q-Tips)
  • Liquid Wrench (one drop to clean old gunk out of gears)
  • Flashlight
  • Toothpicks
  • Sewing Machine Oil
My main sluggish problem was due to lint and threads entangled around bobbin spindle and casing. This is called a "thread jam" per Nova Montgomery on her FW website and is common with FWs.


I pulled out lint and white thread

and next blue thread all wrapped around bobbin case spindle
No wonder it was running sluggish.


At a later date, I may have FW professionally cleaned. In the meantime, I plan on sewing and learning more about care and maintenance. Below are unsolicited FW websites that were beneficial (in no particular order):

http://www.april1930s.com
http://www.novamontgomery.com
http://www.featherweight221.com
http://www.treadleon.net
http://singerfeatherweight221.blogspot.com
http://www.singerco.com
http://www.wikihow.com/Adjust-the-Tension-on-a-Sewing-Machine

A future purchase may be a book about Featherweights by Nancy Johnson-Srebro. I is recommended by many and has good reviews.

Also, there is an online Featherweight Club at My Quilt Place hosted by the American Quilters Society.

Perhaps, you share the same dream of finding a reasonable-priced Featherweight? Don't give up. It will come when you least expect it.


Wednesday, November 20, 2013

Diagonal Blocks Set on Point


All my diagonal blocks have been pieced into rows.  It's taken a long time to get to this stage of my browns & pinks reproduction fabrics.


I hope the above photo is a quick, easy and visual tip for the beginner quilter on how diagonal blocks are pieced into rows.

My next step is to piece the rows. Having a design wall is very helpful. My inexpensive "design wall" is just the reverse side of a flannel-backed tablecloth temporarily tacked onto my basement wall. Click here for previous post.

To see other great works in progress this week, check out Esther's Blog.

Monday, October 21, 2013

Design Wall and Sewing Corner Clean-up!

This week the majority of my sewing time was spent decluttering my basement sewing corner.  I think my sewing clutter multiplied when I wasn't looking (wink).  Sewing amongst too much clutter was not pleasant. I was recently motivated by Teresa over at Fabric Therapy when she reorganized her Quilt Cave.

The decluttering and reorganizing process was a real chore as I dislike doing it but love the results! Therefore, visualizing sitting down to sew in an organized space was my motivation.


I sorted all the notions, etc. and categorized them in their own containers which are inexpensive Glad or Ziplock containers.  They are lightweight and see-though.


Items still handy in cabinet which is behind my chair.


Maybe one day I will get around to labeling the containers, but for now my time is better spent working on the quilt!

Reorganizing still in progress.  Piles and baskets of fabric and to do projects were not in view of the camera.  Haven't touched the fabric, patterns & notes, and buttons yet!

Maybe others have accomplished more sewing this week. Check out more Design Walls at Patchwork Times hosted by Judy L.


Monday, October 14, 2013

Blocks All Pieced

Upon sewing a few blocks here and there, all blocks are pieced together!  They are all on my design wall and in the order of which I have started to piece the rows (on the diagonal).

Here is a before photo of the last two blocks needing piecing.

Last 2 blocks all arranged and ready for piecing.


Here is the after photo.  Yea!  Finally, all blocks pieced.

Last 2 blocks pieced neat and tidy.


After rearranging the blocks, I am now piecing them to the alternate blocks.  I am assembling the rows on the diagonal:


I must admit that I began to tire of piecing the individual blocks and had to nudge myself.  Now while I am assembling the rows, it is great fun.

My overall design wall progress this week:


More Design Walls are featured at Patchwork Times hosted by Judy.


Monday, October 7, 2013

Design Wall Monday

This week I am in good company!  Just like Judy at Patchwork Times, I also have only two blocks to complete for my design wall quilt.  Uh.....I'm not counting the one that is in progress on the machine.


Judy promises to have her two blocks completed today.  I'm not so sure if I can finish my blocks today, but I do promise that they will be pieced by next week's Design Wall Monday.


Tuesday, October 1, 2013

Quilt In Progress

Jill in Michigan, the Great Lakes State, USA

This week I am squeezing sewing time in the morning (first things first) in order to work (only 1-2 blocks per day) on piecing together the last six unfinished blocks on my current quilt.  It will be a scrap-style quilt made of brown and pink reproduction fabrics from the Civil War era. 


I contemplated setting the blocks traditional, but I prefer the above set on point:


I started out leisurely hand piecing, but now I am machine piecing.  I will hand quilt it and am anxious to start on the actual quilting process.


It's amazing the difference how nice fabric pieces look when pieced together as you can see below:


Please stop by Celebrate Hand Quilting hosted by Caron Mosey to see other quilts in progress.


Monday, September 30, 2013

Design Wall Monday

Slight progress made on my Design Wall this past week.  My excuse for slow work is that Michigan has been having great early Fall weather and time has been spent fall gardening.

However, two blocks have been pieced.  I have started to play with borders which I am anxious to start. Note the color of narrow strips looks more yellow in this image than it does on design wall.


Stop by Judy's Patchwork Times to see more quilts in progress on their design walls!


Monday, September 23, 2013

On My Design Wall

Thank you to Judy for hosting Design Wall Mondays at Patchwork Times.  This week I am able to show my progress on my design wall.


During this past week, I cut out some more pieces for my remaining patches.  I am trying to have a true scrap quilt per NQA entry requirements (75 different fabrics).

Below is how I am playing with fabrics on my design wall.  A few blocks need to be pieced and a few need to be tweaked.


I've been playing and moving around scraps this past week.  Now I can start piecing them into blocks.

Had it not been for my design wall, I would not have seen the overall affect nor ever been able to count up to 75 fabrics. LOL! After my tweaks and using some of my less desirable fabrics, the main body will have 76 different fabrics.

My border fabrics will add more prints.

Monday, September 16, 2013

Jill's Sewing Museum


My "old sewing stuff" has now been upgraded to my "Sewing Museum."  It includes a store display box for the needles and an old chic (slightly shabby) sewing tin that belonged to my mother-in-law.


I have two small framed pieces that relate to sewing:
  1. A lovely petit-point framed picture.  The workmanship is very finely done on mesh.  Based on the paper backing on frame and original price sticker, I estimate this to be from the 1940s.  
  2. The second framed piece is a snapshot photo of ladies having a "bed turning of quilts."  The photo is dated 1956.  It is hard to view, but all the ladies are dressed up (including pearls) for the bed turning.  This was a gift from a dear friend who matted the photo on vintage quilt fabric and then framed it.  How clever is that?


Just this past weekend I came across the above "portable" Singer 99K sewing machine at a local estate sale.  It's similar in size to a Featherweight, but much much heavier.  According to serial number, it was made 1955ish. I'm still grateful to have found this treasure as the price was only $25!  My hunt for a reasonably priced Featherweight continues.


Part of my 'lil sewing museum are some of my antique quilts that have been loving stitched by previous generations.

This post was inspired by Beth at Love Laugh Quilt.  Check out others' older sewing items at Beth's innovative linky party entitled"Sewing Museum Linky Party."  Join the party and share some of your 'museum' pieces.  We all can learn.


Tuesday, August 20, 2013

AQS Quilt Show Grand Rapids 2013

What a fun day!  Many wonderful quilts and an abundance of quality vendors.  Eye candy overload!

General overview convention hall picture taken from outer aisle.   
Despite wearing well-cushioned running shoes, I returned home with throbbing feet and legs.  But it was so worth it!  I drove approximately 170 miles from Detroit area to Grand Rapids and then returned home the same day.

With respect to AQS policy of no quilt photos without quilt tag that includes maker's name, I can post just a few snapshots.  Next year I'll be more organized and take better photos of tags as there were some awesome quilts.   Here I am with my Interstate 96 windblown hairdo and Sunshine Sherbet.  I was both surprised and delighted to have SS accepted into this show.


One of my favorites was "Folk Art in the Vineyard" by Teresa Rawson of the popular quilt blog Fabric Therapy.   Quilt pattern was a Lori Smith design.  Lori was a show vendor and she was delighted to see Teresa's use of colors.


Permission Granted

I observed many stopping to admire and photograph it.


Applique work is finely detailed and stitched.


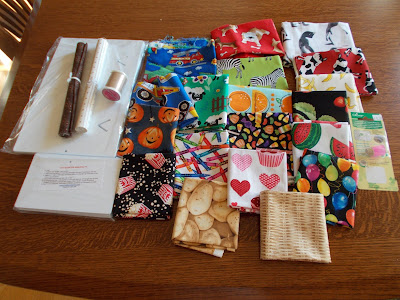
There were so many other great vendors with patterns and wonderful fabrics.  So difficult to choose.  However, this is what I came home with as I want to and need to make an I Spy quilt.  Therefore, I bought mostly novelty fabrics and a few notions which include the plastic sheets to wrap fabric for storage.


Hopefully, other AQS participants will post photos of their quilts so others can view them!