Sunday, April 29, 2018

Slow Sunday Stitching

Today I will attempt to catch up on one of three hand stitching projects just so I can participate in today's Slow Sunday Stitching  post, which refers to Kathy's gang of hand stitchers. Too fun! Sometimes when I am questioned why I do handwork, I empathize with the ladies in the photo. Lol! The three projects have been posted previously.

Slowly working on my needlepoint heart:

More applique practice:

And/or make another EPP tumbler block

This upcoming week I am looking forward to attending one of my favorite quilt shows, Sauder Village Quilt Show. It is an excellent venue with hundreds of quilts hanging in Founders Hall. There is live piano music playing in the background, the hall is well light and the show is not commercialized. If you live within a few hours of Archbold, Ohio, it is well worth the drive. It runs from Tuesday thru Sunday.

Two excellent and well-known quilt instructors are featured this year: Edyta Sitar and Kimberly Einmo. Classes are full, however, their work should be on display for all to enjoy. :-)

I am especially looking forward to viewing a clever and inspiring wall hanging, Food Frenemies, which is hand appliqued and quilted by Teresa over at Fabric Therapy.  Rumor has it that Teresa my be in attendance.  :-)

To see what Kathy's gang of hand stitchers is working on today, please click here.

Jill


Monday, April 16, 2018

Quilt Retreat Weekend

This weekend I was at a quilt retreat in Michigan’s thumb, a two-hour drive from my home. The theme was tropical and named, “A Weekend in Paradise.”


Sounds good. However, mother nature demonstrated that she is in control as this is what was happening outside. Geesh :-(
The outdoors did not stop our sewing spirits. Sewing machines were humming, irons were pressing and rotary blades were cutting. Hand stitching was being accomplished also. Personally, I brought along a few prepped diamonds with hopes of picking up English Paper Piecing tips.

One of my current projects, an 'I Spy' quilt, was on the make-shift design wall at retreat which I enjoy sharing with Small Quilts and Doll QuiltsLove Laugh Quilt, Monday Making and Esther's WIPS on Wednesdays. Esther is a bit under the weather so I am sending Get Well thoughts across the Pond.

The freezing rain/snow storm continued and roads became treacherous. All quilters were welcomed and encouraged to spend an extra night at no extra charge.  Hmmm.....being snowed in at a quilt retreat is sort of/kind of like a Weekend in Paradise.  ;-)

Jill


Monday, April 2, 2018

Design Wall Monday and OMG


The red and white 4-patch disappearing quilt is nearing completion. Two thirds are pieced together. 

This week I am stitching the last third. Piecing the top was March's OMG, however, due to Easter and a few block redo's, the goal was missed. Oh well. Pressure was looming during a busy week. Priority went to Easter preparations. A good thing at my house. This week 4-patch piecing will be a more relaxed and enjoyable process.

(The top portion is not totally visible as DW too small.  Note to self: make a bigger DW.)

A few more blocks need to be put together. Originally, I had the required 48 blocks completed, however, there were too many of the same prints. Therefore, more blocks of different prints needed to be pieced.

Having a design wall has been beneficial. Had I laid out the blocks earlier in the process, the duplicate blocks would have been visible and there would be no redo's. Geesh

I am alternating the large and small prints. IMHO, it makes for a more balanced overall look. Eighteen different red prints are being used. Nine are large scale and the other nine are small scale.

Check out other DW quilts at Small Quilts and Doll Quilts.

Although I did not meet March's OMG, I am motivated to continue on with the quilt top. Thus, today I am linking with Elm Street Quilts April OMG. The goal is to have all the 4-patch blocks pieced, the bottom section attached and add the outside border.

Jill


Design Wall Monday and OMG


The red and white 4-patch disappearing quilt is nearing completion. Two thirds are pieced together. 

This week I am stitching the last third. Piecing the top was March's OMG, however, due to Easter and a few block redo's, the goal was missed. Oh well. Pressure was looming during a busy week. Priority went to Easter preparations. A good thing at my house. This week 4-patch piecing will be a more relaxed and enjoyable process.

(The top portion is not totally visible as DW too small.  Note to self: make a bigger DW.)

A few more blocks need to be put together. Originally, I had the required 48 blocks completed, however, there were too many of the same prints. Therefore, more blocks of different prints needed to be pieced.

Having a design wall has been beneficial. Had I laid out the blocks earlier in the process, the duplicate blocks would have been visible and there would be no redo's. Geesh

I am alternating the large and small prints. IMHO, it makes for a more balanced overall look. Eighteen different red prints are being used. Nine are large scale and the other nine are small scale.

Check out other DW quilts at Small Quilts and Doll Quilts.

Although I did not meet March's OMG, I am motivated to continue on with the quilt top. Thus, today I am linking with Elm Street Quilts April OMG. The goal is to have all the 4-patch blocks pieced, the bottom section attached and add the outside border.

Jill


Sunday, March 25, 2018

Applique Practice

Making an applique quilt is on the list. The Flower Pots quilt pattern by Kim McLean was bought a couple of years of ago. Now it is time to practice in order to get started.

Yesterday, notions and fabric were gathered and some prep work was accomplished in order to join Kathy's Slow Sunday Stitching party today.  :-)  I am going to try freezer paper and needle turn. The method that I choose will be the one that I find the easiest for myself. Wish me luck.


Some may have seen my needlepoint heart project. I am still working on the background. Initially, I thought the background was relaxing. Now it is leaning towards becoming boring (geesh). Another reason to practice applique stitches. ;-)

The red and white disappearing four patch has made some progress. This week a bit more work needs to be done in order to meet my OMG at Elm Street Quilts come Saturday.  Self discipline will be required early this week !
Jill


Applique Practice

Making an applique quilt is on the list. The Flower Pots quilt pattern by Kim McLean was bought a couple of years of ago. Now it is time to practice in order to get started.

Yesterday, notions and fabric were gathered and some prep work was accomplished in order to join Kathy's Slow Sunday Stitching party today.  :-)  I am going to try freezer paper and needle turn. The method that I choose will be the one that I find the easiest for myself. Wish me luck.


Some may have seen my needlepoint heart project. I am still working on the background. Initially, I thought the background was relaxing. Now it is leaning towards becoming boring (geesh). Another reason to practice applique stitches. ;-)

The red and white disappearing four patch has made some progress. This week a bit more work needs to be done in order to meet my OMG at Elm Street Quilts come Saturday.  Self discipline will be required early this week !
Jill


Sunday, March 11, 2018

Needlepoint Heart Filled

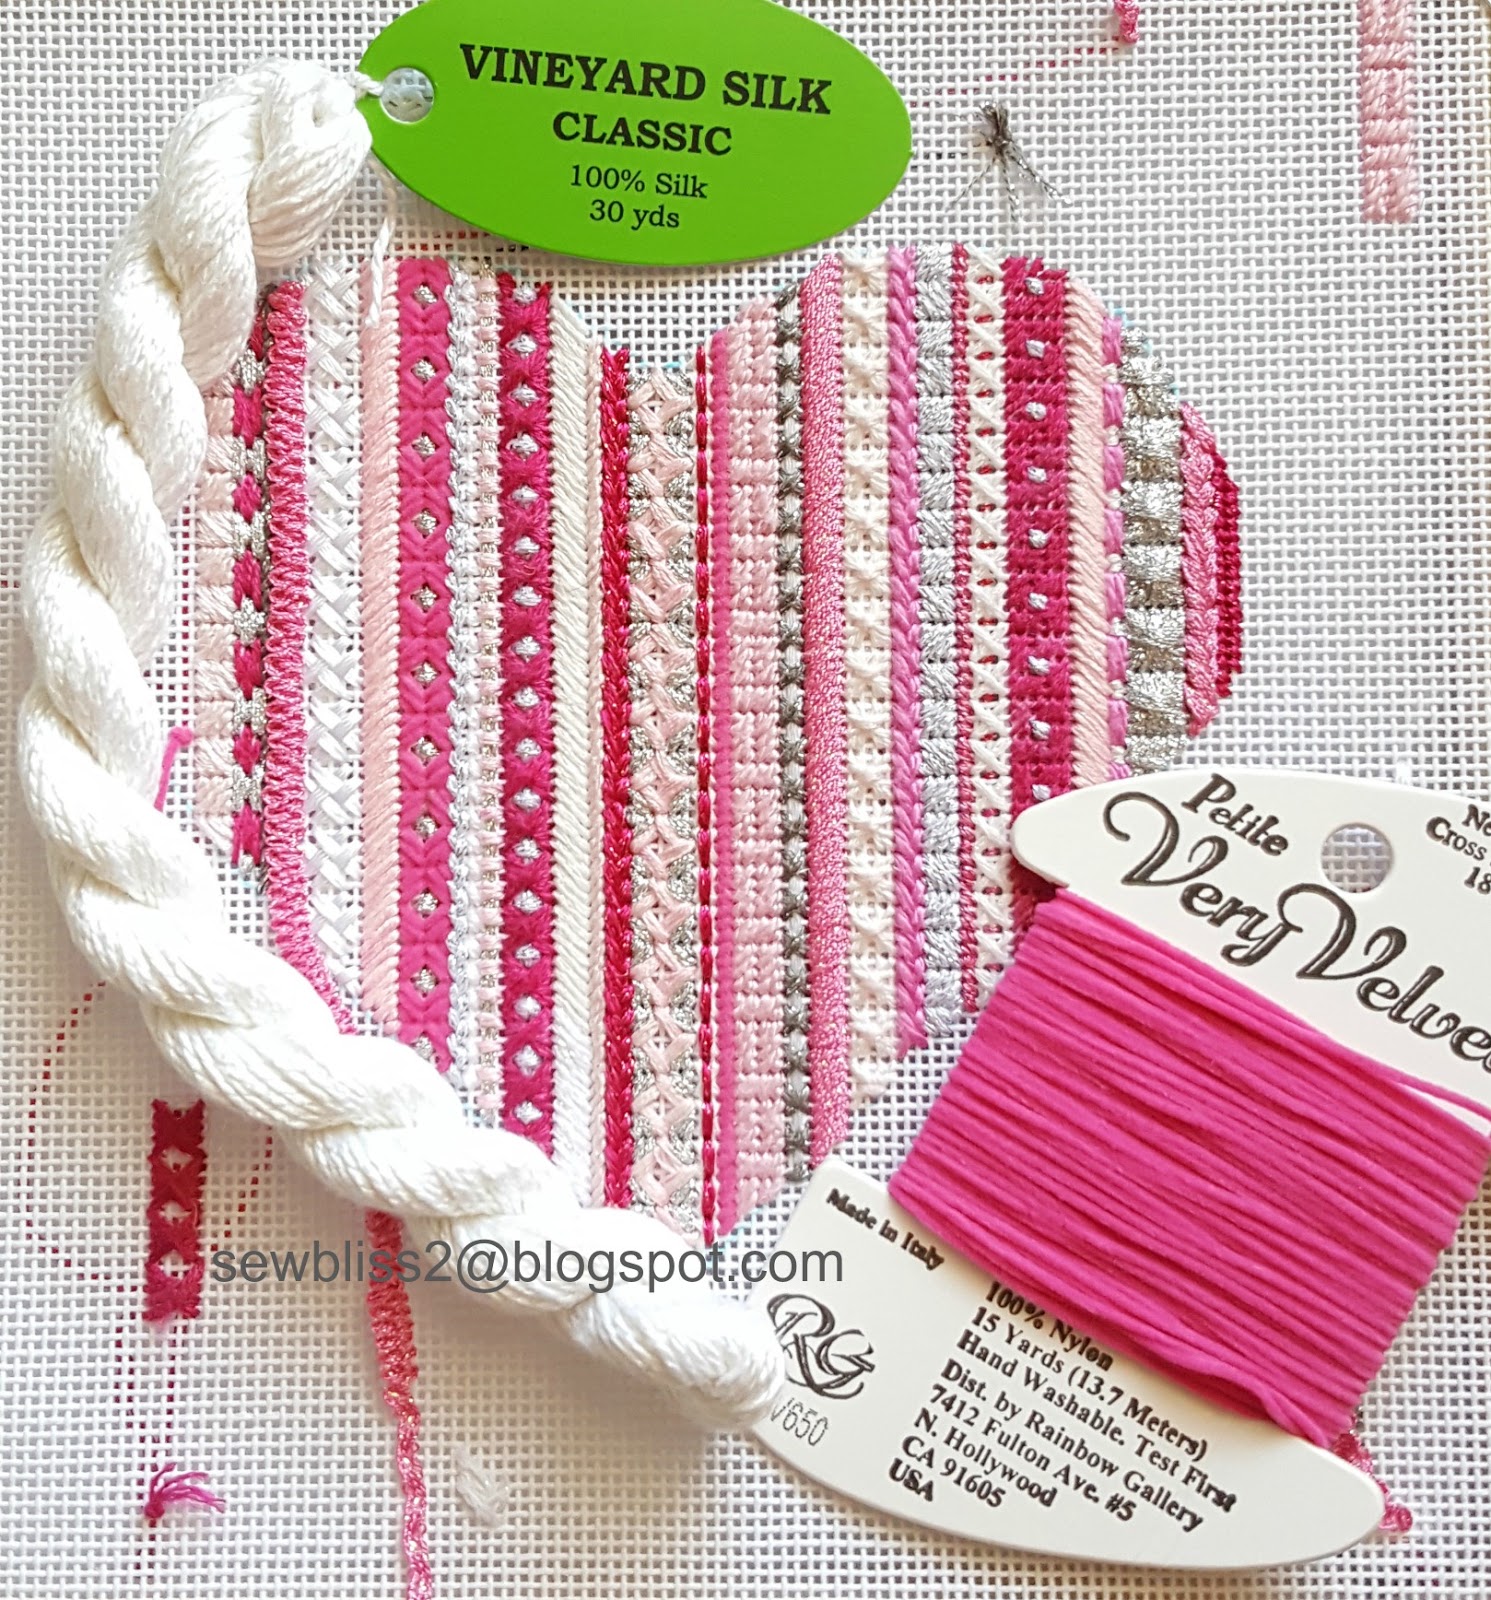
The needlepoint pink-stripped heart has been filled with its variety of decorative stitches. Next step is stitching the background. I have chosen a white silk fiber. Sorry, I do not know the name of the stitch pattern which resembles a basket weave.

I will be filling in the background as I join Kathy's Slow Sunday Stitching.

The heart design and fibers are from a class taken at The Wool and The Floss in Grosse Pointe, Michigan.

Jill

Needlepoint Heart Filled

The needlepoint pink-stripped heart has been filled with its variety of decorative stitches. Next step is stitching the background. I have chosen a white silk fiber. Sorry, I do not know the name of the stitch pattern which resembles a basket weave.

I will be filling in the background as I join Kathy's Slow Sunday Stitching.

The heart design and fibers are from a class taken at The Wool and The Floss in Grosse Pointe, Michigan.

Jill

Sunday, March 4, 2018

Slow Stitch Heart

As I join other kindred slow stitchers this Sunday, I hope to finish filling in the needlepoint heart. Only three more rows. The simple, easy continental stitch with pink velvet is fun and nice coverage over 18 count canvas.


Despite that Valentine's Day is past, I shall continue on with the background. I have chosen white silk with the hopes of making the heart stand out.

Check out Kathy's weekly Slow Sunday Stitching post to see other hand needlework projects.

Jill

Slow Stitch Heart

As I join other kindred slow stitchers this Sunday, I hope to finish filling in the needlepoint heart. Only three more rows. The simple, easy continental stitch with pink velvet is fun and nice coverage over 18 count canvas.


Despite that Valentine's Day is past, I shall continue on with the background. I have chosen white silk with the hopes of making the heart stand out.

Check out Kathy's weekly Slow Sunday Stitching post to see other hand needlework projects.

Jill

Saturday, March 3, 2018

March's Goal ~ OMG

The small, manageable goals that I have set the past two months are resulting in inching my way to a completed quilt. Therefore, I am delighted to join other goal setters at Elm Street Quilts March OMG. This month's goal is to have all 48 blocks pieced together.

There will be some block rearranging in the process. Afterwards, a decision will be made for the need of a border...or not.  ;-)

Jill

March's Goal ~ OMG

The small, manageable goals that I have set the past two months are resulting in inching my way to a completed quilt. Therefore, I am delighted to join other goal setters at Elm Street Quilts March OMG. This month's goal is to have all 48 blocks pieced together.

There will be some block rearranging in the process. Afterwards, a decision will be made for the need of a border...or not.  ;-)

Jill

Wednesday, February 28, 2018

Red & White Blocks ~ OMG

During the month of February I pieced more blocks for the red and white disappearing four patch.


Previously, I was unsure on the finished size and if there would be a border or not. I am a visual person, therefore, I needed to get the blocks on a design wall to help me decide.


I prefer the layout of six rows across and eight down. When the borders are added it, will be approximately the size of a twin comforter.

As they quilt, grew two design walls were made one with a gridded gray flannel and the other with leftover cotton batting. A third one will be made as the quilt is getting larger. Note the bottom row is taped on. Lol.

My personal preference is to have a border which I need to determine next. This month's  motivation was meeting a deadline for One Monthly Goal (OMG) at Elm Street Quilts. Mission accomplished. Design wall is up and blocks necessary are completed.

Admittedly, there were several February distractions, i.e., Olympics, a needlepoint project and thoughts of spring reorganizing.


I hope to do more quilt piecing in March.  I am also linking to WIPs on Wednesdays where you can view great projects in the making.

Jill 

Red & White Blocks ~ OMG

During the month of February I pieced more blocks for the red and white disappearing four patch.


Previously, I was unsure on the finished size and if there would be a border or not. I am a visual person, therefore, I needed to get the blocks on a design wall to help me decide.


I prefer the layout of six rows across and eight down. When the borders are added it, will be approximately the size of a twin comforter.

As they quilt, grew two design walls were made one with a gridded gray flannel and the other with leftover cotton batting. A third one will be made as the quilt is getting larger. Note the bottom row is taped on. Lol.

My personal preference is to have a border which I need to determine next. This month's  motivation was meeting a deadline for One Monthly Goal (OMG) at Elm Street Quilts. Mission accomplished. Design wall is up and blocks necessary are completed.

Admittedly, there were several February distractions, i.e., Olympics, a needlepoint project and thoughts of spring reorganizing.


I hope to do more quilt piecing in March.  I am also linking to WIPs on Wednesdays where you can view great projects in the making.

Jill 

Monday, February 12, 2018

Make a Design Wall

Today I would like to demonstrate my method of making a design wall while linking and sharing with Design Wall Monday. It is relatively inexpensive, no holes in the wall, easily moved around and packed away when not in use.


The flannel fabric is from Kaffe Fassett. You can use any flannel, felt or batting.  This particular one measures 44 x 66 inches. With this method, you can make your design wall any size.

Hanging supplies are an oval spring tension curtain rod, 3-M Command tabs, neodymium disc magnets, flat metal washers, and a tape measure. My cost from my local big box home improvement store was $17 (not including fabric).


  • Put two Command tabs together (velcro sides)
  • Remove protective paper adhesive on one side 
  • Affix a flat round metal washer
  • Add neudymium magnet(s) 
  • Decide where to place on wall
  • Remove the reverse side paper adhesive
  • Press Command Hook firmly on wall
  • Add more homemade magnetic tabs (depending on your desired width)
  • Sew a simple rod pocket at top of your design wall (flannel, felt, etc.)
  • Insert tension rod into pocket
  • Place rod near your Command Hook magnatic hanger
  • Magic happens as rod grabs the magnets

Shopping tips:
If you buy everything at one store, it is easy to test the holding power. Place the curtain rod on the neodymium magnet on the flat metal washer. If it grabs, then you are good to go.  The flat washer adheres nicely to the sticky side of the Command Hook.
Purchase Neodymium Disc Magnets (regular ones not strong enough)
Use appropriate 3MCommand Hooks (note how much weight they will hold). I bought the package that holds 9 pounds. They have velcro and are equivalent to the Command Hooks that are for picture hanging. Yes it is confusing shopping the 3M Aisle.


At home:

  • Be extra careful not to get your set of three neodymium magnets near the other set of three magnets as they will firmly adhere to one another. Good luck pulling them apart. If they do get stuck together, hire a high school football player to pull them apart or click here for a video. Ask my why I needed to find this video.
  • Use a tape measure / ruler to measure down from the ceiling so that Command Hooks are relatively straight. 


Other items of note:

  • Optional is a second tension rod for the bottom which holds the flimsy flannel more steady. It is not necessary, but I prefer it. 
  • Regular ceramic magnets are not as strong. Neodymium are extremely strong and are NOT for children.  The size that I used measure 18 mm x 3 mm which is the largest that I was able to buy. 

This red and white quilt is actually too small for this flannel design wall. Geesh! Soon I will be making a larger design wall to accommodate more blocks and a border. This is a great way to hang quilts for display which I plan on doing within a few weeks. Stay tuned.

Since the red and white quilt continues to be a work in progress, I am linking with Esther's blog.

Jill


Make a Design Wall

Today I would like to demonstrate my method of making a design wall while linking and sharing with Design Wall Monday. It is relatively inexpensive, no holes in the wall, easily moved around and packed away when not in use.


The flannel fabric is from Kaffe Fassett. You can use any flannel, felt or batting.  This particular one measures 44 x 66 inches. With this method, you can make your design wall any size.

Hanging supplies are an oval spring tension curtain rod, 3-M Command tabs, neodymium disc magnets, flat metal washers, and a tape measure. My cost from my local big box home improvement store was $17 (not including fabric).


  • Put two Command tabs together (velcro sides)
  • Remove protective paper adhesive on one side 
  • Affix a flat round metal washer
  • Add neudymium magnet(s) 
  • Decide where to place on wall
  • Remove the reverse side paper adhesive
  • Press Command Hook firmly on wall
  • Add more homemade magnetic tabs (depending on your desired width)
  • Sew a simple rod pocket at top of your design wall (flannel, felt, etc.)
  • Insert tension rod into pocket
  • Place rod near your Command Hook magnatic hanger
  • Magic happens as rod grabs the magnets

Shopping tips:
If you buy everything at one store, it is easy to test the holding power. Place the curtain rod on the neodymium magnet on the flat metal washer. If it grabs, then you are good to go.  The flat washer adheres nicely to the sticky side of the Command Hook.
Purchase Neodymium Disc Magnets (regular ones not strong enough)
Use appropriate 3MCommand Hooks (note how much weight they will hold). I bought the package that holds 9 pounds. They have velcro and are equivalent to the Command Hooks that are for picture hanging. Yes it is confusing shopping the 3M Aisle.


At home:

  • Be extra careful not to get your set of three neodymium magnets near the other set of three magnets as they will firmly adhere to one another. Good luck pulling them apart. If they do get stuck together, hire a high school football player to pull them apart or click here for a video. Ask my why I needed to find this video.
  • Use a tape measure / ruler to measure down from the ceiling so that Command Hooks are relatively straight. 


Other items of note:

  • Optional is a second tension rod for the bottom which holds the flimsy flannel more steady. It is not necessary, but I prefer it. 
  • Regular ceramic magnets are not as strong. Neodymium are extremely strong and are NOT for children.  The size that I used measure 18 mm x 3 mm which is the largest that I was able to buy. 

This red and white quilt is actually too small for this flannel design wall. Geesh! Soon I will be making a larger design wall to accommodate more blocks and a border. This is a great way to hang quilts for display which I plan on doing within a few weeks. Stay tuned.

Since the red and white quilt continues to be a work in progress, I am linking with Esther's blog.

Jill